SeaWall
1The Best Riprap Shoreline Money Can Buy. The Only Shoreline Tougher Than Nature.
The best way to end erosion, ward off muskrats, resist ice-heaving, and add beauty to your property.
Stop the Erosion and Start Enjoying Your Shoreline – Contact Us
How, exactly, is a Lakeshore Aquascape rip-pap better than a standard-issue rip-rap shoreline?
Well, besides the poor craftsmanship you’ll notice as soon as you see landscapers’ work, the differences are almost too many to name. You might as well ask me to describe the differences between a Miles Davis song and a Kenny G song. But you asked, so please hang with me. You can click on one of these links to jump down to read more about a specific difference:
- Difference 1: 3:1 Slope
- Difference 2: Compaction
- Difference 3: Proper Fabric
- Difference 4: Secured Fabric
- Difference 5: Quantity of Fabric
- Difference 6: Seamless Design
- Difference 7: Critter-Proofing
- Difference 8: Fieldstone
- Difference 9: Clean Riprap
- Difference 10: Custom-Built Riprap Bucket
- Difference 11: Amount of Riprap
- Difference 12: Hand-Placed Riprap
- Difference 13: How We Transport
- Difference 14: Our Edging (optional)
- Difference 15: Frost-Break™ (optional)
- Difference 16: Our Cleanup
#1: 3:1 Slope
All our riprap Armored Shorelines include proper grading and reshaping of your shoreline. Trying to achieve a 3:1 slope (or as close to a 3:1 slope as possible) is extremely important when properly restoring a shoreline. Nearly all landscapers build shorelines at the wrong slope, and nearly all of their shorelines crumble into ruin.
 Note: Some shorelines simply don’t allow for a 3:1 slope, in which case every effort should be made to make it lower than a 2:1 slope.
There are two main reasons a shoreline should pitch at a 3:1 slope:
-
- Ice-jacking. This is the main reason. The more vertical the shoreline is, the greater the chance that the ice will jack or heave the shoreline landward during the winter months. The more horizontal or flat your shoreline is, the greater the likelihood that the ice will slide up onto your shoreline (good), rather than push against or into it (bad).

- A shoreline with a 3:1 slope is better at deflecting incoming waves than shorelines with greater or lesser slopes. The idea is to best disperse the kinetic energy of the never-ending waves pounding your shoreline.


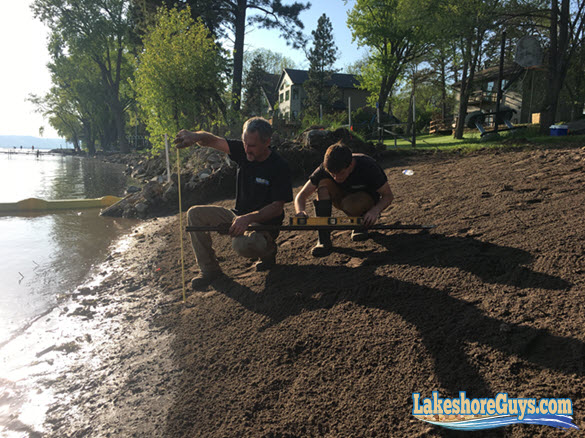
#2: Compaction
By itself, even a 3:1 slope won’t help your shoreline – unless the soil is compacted properly.
If the soil is loose and airy, it will deform once you pile several tons of riprap stone on it. Though the pile of riprap may appear to have a 3:1 slope, the underlying soil may not, in which case the stones are fighting gravity. Gravity will win every time. The land under the riprap (and under the fabric) needs to maintain a 3:1 slope, both before and after the fabric and riprap are laid down.
You can’t assume a pile of dirt will be shaped exactly the same after you’ve dropped several tons of stone onto it. A true shoreline expert readies the ground for what will go on top.
That’s why we compact the soil before we install the fabric and the riprap. It’s one of the less-glamorous, more-arduous parts of the whole process. That’s one reason nobody else seems to bother. (Even other companies that specialize in shorelines seem to figure, “Well, the heavy stones will take care of the slope, right?”, and it wouldn’t even cross landscapers’ minds.)
How do we compact the soil of your shoreline, before putting down the fabric and stone?
Usually we use our backhoe bucket, by repeatedly tapping it into the ground. It does a much better job than a mechanical compactor can (we’ve tried that).
Sometimes we use the grader bar on our Bobcat. That works well also because it levels and flattens the shoreline as we compact it.
If the ground is very sandy, we pretend your shoreline is a vat of vineyard grapes, and employ the foot-stomping method. A thorough walking-over does the trick.
#3: Proper Fabric (8-oz. needle-punch filter-fabric)
We use extra-thick 8-ounce industrial needle-punch filter-fabric. Not only do we use ultra-thick, premium fabric that others don’t know about or won’t fork over for, but we also use more of it than anyone else would. The cost of our needle-punch filter-fabric is quintuple that of its 4-ounce little brother.
The fabric is so tough we often bend our staples trying to secure it to the shoreline. For every four staples we use, three will bend, and only one gets through the fabric and into the earth. We don’t mind putting the staple maker’s kids through college, because each staple that makes it through the fabric is a rivet in your armor.
Ultra-tough calendered filter-fabric, pictured on the right

If nanotechnology takes off, we’ll be the first company to use nanobots to protect your shoreline. Until then, our custom-made, heat-treated, staple-devouring calendered fabric will buy you some extra decades.
#4: Secured Fabric
As I mentioned above, it’s important to be maddeningly thorough when stapling the fabric to the shoreline. We use -six-inch steel staples to secure the fabric, prior to riprapping the shore. We do this because we know anything that helps hold this vital fabric barrier in place will help your shoreline last longer.

The main purpose of these staples is to prevent the fabric from shifting when we place the riprap.
Note: Although these staples do breach the fabric, a high-quality filter fabric will nearly seal itself around each staple. Still, for added protection, we place a single stone directly over each staple, so that it doesn’t get clunked by a riprap stone when we pour on the mother lode.
#5: Quantity of Fabric
Not only do we install the granddaddy of filter-fabric (8-ounce weight), but we install more of it than our competitors do.
That means both the landward side and the water side of the shoreline receive better coverage.

This is extremely important when trying to minimize washout – on the water side of your riprap (the “toe” of your shoreline) during periods of low water levels with strong wave-action. It also minimizes washout on the landward side of your riprap (the “heel” of your shoreline) during periods of high water levels or periods of high water levels and heavy wave action.
Remember: the main role of the fabric in your shoreline (beneath the riprap) is to prevent soil erosion. But you may be surprised to know that, aside from displacing wave energy and helping to combat ice-jacking, the main purpose of the riprap itself is merely to hold the fabric in place. Hence the reason that the type, quality, and thickness of the fabric used in your shoreline is so important. Fabric is the real backbone of your shoreline.
#6: Seamless Design

Yes, we have even more to say about the fabric part of an expertly riprapped shoreline. Even the best fabric on the planet will fail miserably if it’s seamed improperly. With Lakeshore Aquascape you won’t have to worry about seams, because in almost all cases there won’t be any. We avoid seams as a cat avoids water.

However, if a seam is absolutely necessary, then we’ll do it right. We cannot overemphasize the word “right” in this case. Assuming a seam in the fabric is unavoidable, the following steps are crucial:
- On a lake shoreline, a vertical seam must be overlapped by at least 2 feet, and it must be stapled to the ground and to the second layer of fabric beneath it thoroughly. A horizontal seam must be overlapped by at least 2 feet, stapled to the ground and to the second layer of fabric beneath it thoroughly, and be shingled in the proper direction (that is, the landward piece of fabric must cover the water-facing piece of fabric).
- On a riverbank, a vertical seam must be overlapped buy at least 3 feet, stapled to the ground and to the second layer of fabric beneath it thoroughly, and be shingled in the proper direction (an upriver piece of fabric must cover the downriver piece of fabric). A horizontal seam must be overlapped by at least 3 feet, stapled to the ground and to the second layer of fabric beneath it thoroughly, and be shingled in the proper direction (the landward piece of fabric must cover the water-facing piece of fabric).
#7: Critter-Proofing
Because not everyone has issues with critters burrowing into their shoreline and raising havoc, we’ve made this an optional part of our Armored Shoreline. You can read about our critter-proofing precautions here.

#8: Fieldstone
Riprap comes in all shapes, sizes, and colors. With us, unless you specifically ask us to use something other than fieldstone, we’re going to use fieldstone riprap (aka river rock or glacier rock) that’s 6-12 inches or 12-18 inches in diameter. On occasion we may need larger riprap (up to 30 inches in diameter), but that’s rare.
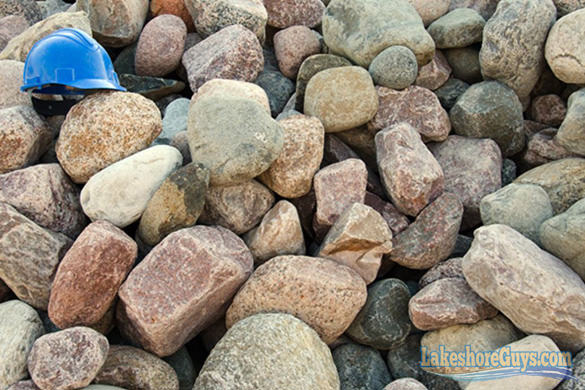

Several benefits of 6-18-inch fieldstone:
- Fieldstone is round and smooth, and rarely has jagged edges that can damage the fabric beneath during installation. Heavy wave action can also drive jagged types of riprap through even the thickest of fabrics. Round, smooth rocks seem less affected by large waves because they lack the flat spots where wave action can gain leverage and push them around your shoreline or sweep them into the lake or river. Just as a baseball is aerodynamic, a round fieldstone is aquadynamic.

- It’s heavy. Fieldstone riprap is heavier than crushed riprap, like limestone. Heaviness is good because it keeps the underlying fabric in place. That fabric is the backbone of your riprap shoreline, and protecting it with a heavy pile fieldstone means your shoreline will last longer. (Fun fact: The blueish colored rocks in fieldstone riprap are by far the heaviest.)
- It’s colorful & attractive. Most people find the unique blend of fieldstone colors to be quite attractive. Its multicolor palette also blends well with most natural lake and river environments.

- It gathers less floating debris. Round, smooth riprap tends to catch and retain less floating flotsam – like aquatic weeds, water bottles, and anything else that may drift ashore.

#9: Amount of Riprap
We never skimp. When it comes to riprap, more is almost always better than less. We include approximately 20% more riprap than whatever amount we’d consider “good enough.”
Why do we do use 20% more riprap? Because every year we have to rip out a wrongly installed shoreline that didn’t last as long as its owner’s pet goldfish. These duds were usually cobbled together by landscapers, who spend most of their time between beer breaks fretting over their margins and wondering how they can bid projects even lower than the next landscaper bids.
Every year we’re reminded of why it’s said that “quality pays for itself.” If you want your shoreline done once and done right, there’s no reason to skimp on riprap.

We won’t simply pile the rock a little higher on your shoreline. Rather, we’ll stretch your shoreline out a little more, both on the landward side and on the water-facing side. We’ll also add a little extra riprap here ‘n there, as needed.
Extra riprap on the water-facing side of the riprap (the toe) will help minimize the chances that your new riprap shoreline isn’t weakened by wave action. Wave action will slowly eat away at the lake bottom under your riprap (That’s a common problem with riprap shorelines where the riprap and fabric simply was not extended far enough into the water.)
 Extra riprap on the landward side of your shoreline (the heel) will help protect the top end of your riprap during periods of high water and/or extreme wave action.
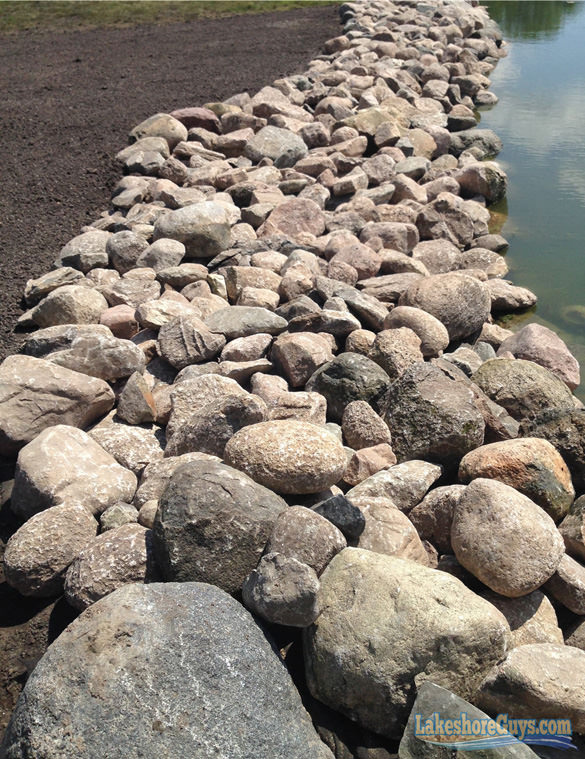 Extra riprap here ‘n there. There’s no trophy given to whomever installs the thickest pile of riprap along a shoreline. In fact, aside from thoroughly covering the fabric with a layer of riprap, too much riprap is almost always pointless. The purpose of riprap is simple: Aside from holding the fabric in place with downward pressure, dispersing the kinetic energy of waves, helping to deflect the movement of winter ice, riprap also helps protect the filter-fabric from deterioration caused by UV rays. Covering as much of the fabric as possible with riprap adds years to a riprapped shoreline.

#10: Hand-Placed Riprap
Where most contractors simply pile on riprap with heavy equipment and smash it around with their giant steel bucket, we spend hours shuffling around hundreds of rocks by hand. This is hugely important for 5 reasons:
1. Aesthetics. Did Michelangelo paint the Sistine Chapel with a roller? Your new riprap shoreline will look divine only after we’ve moved around hundreds of rocks by hand.
First we perfect the row of riprap in the water. Then we make the row of riprap along the top edge of your shoreline perfect. Finally we take on the daunting job of moving around many hundreds of rocks in the center of your shoreline, filling everything in nicely.
It’s all to make your shoreline smooth and settled-looking.
 2. Covering the fabric. As we shuffle around many hundreds of rocks by hand, we pay close attention to any areas of exposed fabric, and we make sure to cover those areas with perfectly sized rocks. Again: riprap is the only material that protects your all-important fabric from harmful UV rays.
3. Covering Staples. We also pay close attention to any visible staples that can be seen through the face of the riprap. Any staple that can be seen through the riprap is covered with single piece of riprap placed squarely on top.
4. Creating a Flat & Smooth Surface. Through all this hand-placement of the riprap, we’re able to create a much smoother surface. Whereas most shorelines act as Velcro for weeds and water bottles and dead fish, our smooth shoreline will hold onto a minimum of that flotsam.
5. Locking your shoreline together as one. Shuffling riprap by hand lets us interlock your riprap together so that it hangs together as a cohesive whole when buffeted by extreme waves. Most shorelines are piles of riprap that are as armored as a yarn sweater, whereas a Lakeshore Guys® Armored Shoreline is tightly woven like Kevlar.
#11: Our Edging (optional)

There’s nothing wrong with a simple riprap shoreline bordered only by grass or other natural turf. But we typically recommend it, and most of our customers want it. That’s because edging – made of concrete, brick, poly, or stone – brings a number of benefits:
Easy mowing and maintenance. When you have riprap right up against your turf, you’re left with the painstaking task of weed-whack all the grass in between the large rocks. Most people find this as pleasant as a root canal, so usually these areas go untended and your shoreline becomes an unkempt mess. Even if you do weed-whack the edge every weekend, you’ll create a layer of grass clippings that eventually decomposes and becomes soil. After a few years, your once-clean, weed-free sheet of filter-fabric becomes a garden of weeds, grass, and other plants you didn’t sign up for.
Now, imagine a nice border of edging approximately 1-2 feet wide, running alone the top edge of your riprapped shoreline. It’s a buffer between your riprap and your yard.

You’ll be able to run your mower deck right over the top of this edging and leave your weed-whacker in the garage. Also, if you keep your mower chute pointed away from your shoreline, you won’t have to worry about covering your shoreline with grass clippings (i.e. future compost).
Aesthetics. We haven’t met anyone who doesn’t like the look of crisp, clean edging that matches the riprap. Edging and decorative rock gives your shoreline the tailored, finished look it deserves. We can install commercial-grade poly edging, brick edging, concrete edging, and more.
 Additional high-water and wave protection – AKA a “Splash Apron.” This thin strip of rock not only looks amazing, but also helps to protect your shoreline in the event of high water levels. Because we’ll use the same piece of filter-fabric under your decorative rock border that we used under your riprap, you’re getting that much more in flood protection. The higher the same solid piece of uncut fabric extends landward, the better your flood protection.
When installing your filter-fabric (prior to riprap installation), we will leave several feet of excess fabric near the top edge, running the entire length of your shoreline. After we’ve installed your riprap, we will install a border of edging along your entire shoreline. The next step is simply to unfold or unroll the excess filter-fabric along the top edge of your riprap so that it lies flat on the ground and covers the newly installed border of edging. At this point we will trim the fabric along the inside perimeter of your newly installed edging, and thoroughly staple it to the ground.
Now you’ve got riprap with fabric underneath it, and that same piece of fabric extends several feet up to the newly installed edging border. That combination provides added insurance against high water levels and heavy wave action. Remember, water that gets under the filter-fabric can cause erosion. The higher the fabric extends landward, the better your protection is.

At this point your shoreline’s weakest point is the trimmed edge of the fabric adjacent to the edging border. Not to worry, though; read on.
Even more high water and wave protection. Instead of installing poly or individual bricks as edging, we can install one 5 x 7 continuously poured concrete curb along your entire shoreline.

Rather than trimming the fabric up against the poly or brick edging, we’ll install this solid continuous concrete curbing directly onto the fabric. This virtually eliminates the ways water can seep get under the top edge of the filter-fabric along your shoreline. This curbing option will typically protect your shoreline even if it’s completely underwater.
Of course, Mother Nature will still do as she pleases. But with this curbing method your shoreline is far more likely to survive period of extremely high water – and it will look sharp.
All our curbing contains steel cable that runs through the entire center of the curb, as well as polymer and fiber additives for even greater strength. We can customize this concrete curbing in all kinds of ways: we can color it, hand-stamp it with a natural stone texture, and even incorporate LED lighting.
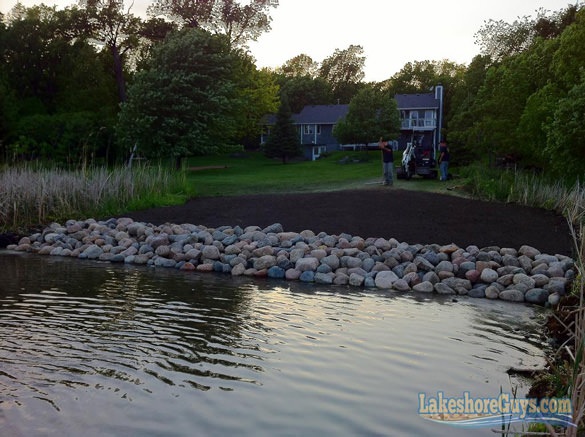
#12: Frost-Break™
A Frost-Break™ is an option we can add to your new or existing riprap shoreline. It’s a way to protect your shoreline from ice heaving.
Imagine the riprap at an angle. It starts high on dry land and moves down the slope, where it extends about two feet into the water.
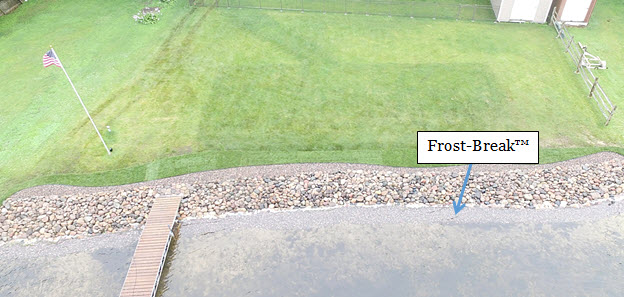
Example of Frost Break Shoreline
In the winter, the water freezes, and the riprap stones freeze in the water. They also freeze to the bottom of the lake.
The bottom of the lake is waterlogged. There’s water on it 24/7. So when the ice starts to jack – that is, to expand towards the shoreline – it’s not just the ice that comes charging toward your shoreline. It’s also the lake bottom. One giant mass, an icy bulldozer.
A Frost-Break is a swath of smaller river-rock that we place on the lake bottom directly in front of the riprap – in the water (the “toe” of your riprapped shoreline). This creates a buffer between the bottom of the ice sheet and the lake bottom (as well as a bit of separation from the riprap itself). When the ice starts to expand, the bond between the ice and the lake should break at the Frost-Break (the pile of small rock along the toe of your shoreline). We like to call this the “fault line.” It protects your shoreline and minimizes the chances of Mother Nature undoing all the work that’s gone into creating it.
#13: Our Cleanup
Our job-site cleanup and yard cleanup process is the stuff of legend among our customers. We pride ourselves on how clean and undamaged we leave your property.
We’ll cover any areas of unavoidably, lightly tousled turf with premium pulverized topsoil. We compact it a little, hand-rake it smooth, and spray it with a mixture of grass seed and mild fertilizer. Sometimes we’ll even dust the areas with a light coating of straw, which can aid in minimizing erosion and help moisture-retention.
Any areas of your yard that aren’t actually “damaged” but that show signs of wear from heavy foot traffic or wheelbarrow traffic will be thoroughly hand-raked, fluffed-up, and broadcasted with a mild fertilizer to help make it better than new.
The street side and driveway area we will thoroughly scrape, swept and leave as clean as possible upon completion. If we had to use your driveway for riprap storage or if we had to drive across it multiple times, there’s a good chance we may break out the garden hose and give it a quick bath. In some cases we’ve even been known to haul out our commercial grade hot-water pressure washer.
Anything we moved in your yard we will return to its original location. We leave everything the way we found it or better than we found it.
Muskrat-resistant shorelines
